Showing posts with label Computer Tips.. Show all posts
Saturday, January 5, 2013
How to fix wifi grayed out in iPhone 4s
Hi. I'm one of the iPhone 4s user. I also bought iPhone 4s for my wife. Three month back, I update my wife's iPhone from IOS 5.0.1 to IOS 6. After that, I update mine to IOS 6. For my wife iPhone, after a month using the new IOS, the wifi suddenly her iPhone cannot detect any wifi connection. Then, she ask me to fix it. I decided to restart her iPhone. I thought, after restart,the wifi will be working again. Unfortunately, the wifi button become grayed out. I cannot even turn it on. Then I decide to send it to the dealer since her iPhone still under warranty. Then send it back to Apple and Apple change it to a new one.
For my iPhone, everything is fine and I update to IOS 6.0.1. The latest version. Last two night, suddenly my iPhone cannot detect wifi. And then, I turn the wifi button off and turn it on again. The result is still the same. Then I decided to downgrade the IOS 6.0.1 to IOS 5.1.1. Last night, I try to downgrade using Redsnow. Unfortunately, I failed to downgrade the IOS and the best part is, the wifi is back to normal. I can turn it on and off and also connect back to my home wifi.
How I do it? Just follow below step. Please note that, if you turn off your iPhone, the wifi will become grayed out again.
File needed : Redsn0w 0.9.14b2, IOS 5.1.1 firmware.
Step 1 - Download two file from above link.
Step 2 - Double click the Redsnow 0.9.14b2
Step 3 - Click on Extras
Step 4 - Click on Even More
Step 5 - Click on Restore
Step 6 - Click on IPSW and locate the IOS 5.1.1 firmware that you just download.
Step 7 - Click Ok on the warning.
Step 8 - Connect you IPhone
Step 9 - Click Next
Step 10 - Let the application finish checking
Step 11 - After about one hour, the application will tell you that downgrade is failed.
Step 12 - Just disconnect your iPhone and restart it.
Step 13 - Check on the wifi setting. It should be ok already.
Good luck...
Note: Try at your own risk. I had tried it and success.
Reference : http://www.redmondpie.com
Monday, July 4, 2011
Camne nak download YouTube Video tanpa menggunakan downloader.
Korang kenal tak laman web ni?YouTube. Kompem kenal kan. Laman web YouTube ni sangat popular kot. Semestinye korang pergi ke laman web ni untuk tengok video kan. Macam2 video ade kat laman web ni. Betul tak.
Shino bukan nak bercerita pasal laman web YouTube ni, shino nak kongsi cikit camne cara nak download video dalam YouTube ni tanpa perlu anda install downloader.
1) Korang pergi ke website YouTube tu sendiri. Pastu korang search video apa yang korang nak download tu. Pastu korang klik pada video yang korang nak download tu. Masa video tu tengah buffer, korang pause dulu. pastu korang copy link video tu.
cth : http://www.youtube.com/watch?v=Wq4Y7ztznKc
2) Korang pergi ke website ni. http://keepvid.com/ camni la gambar website ni.
3) Korang paste link video dari YouTube yang korang nak download tu, pastu korang tekan download. Korang tunggu website ni habis process dulu.
***website ni akn mintak nak run java platform. Korang tekan run je.Ni gambar bile website tu da siap process.
dalam kotak merah dalam gambar atas ni, list format video yang korang leh pilih untuk download. shinobese akan pilih yang 720p sebab kualiti die tinggi cikit. gambar pun lawa. tapi saiz die besar cikit la.
4) Korang pilih format n saiz yang mane satu korang nak, pastu tekan link tu. gambar kat bawah ni akan keluar kalau korang tak install downloader.
tekan pada save file, pastu tekan ok. video yang korang nak download akan start download automatik.
selamat mencuba..
p/s: untuk guna aplikasi ni, korang mesti ade java platform. Kalau takde, download and install dulu. korang leh download kat cini...http://www.java.com/en/download/index.jsp
Saturday, June 18, 2011
Antivirus untuk komputer korang...
Antivirus...Software yang wajib ade dalam semua komputer...ape pentingnye antivirus ni?
1) Selamatkan komputer korang dari bencana virus.
2) Selamatkan data korang dari di makan dek virus ni.
3) Selamatkan duit korang dari dibelanja oleh hacker.
Antivirus ape yang paling ganaz leh lawan semua virus ni?Kalau korang tanye shino, shino tak tau sebabnye, tak semua antivirs leh tangkap semua virus yang ade kat planet bumi sekarang ni...boleh dikatakan, tiap2 hari, ade je virus baru yang muncul...so, mane2 antivirus yang berjaya atasi serangan virus ni dulu, aitivirus ni la yang paling hebat...
Kenape shino letak gambar antivirus microsoft security essential ni?hebat sangat ke?sebabnye, shino gune antivirus ni la...nak kate hebat sagngat tu, tak de la sehebat mane pun...shino gune operating system window 7 pro...secara logicnye, mesti la microsoft punye antivirus ni tau structure operating system die sendiri kan...sebab tu la shino percaye kat antivirus ni...
Camne nak dapatkan antivirus ni?Korang leh download je kat SINI...kalau korang da pakai antivirus ni n korang nak update secara manual, korang leh download kat SINI...Sebelum korang download antivirus ni, korang kena pakai windows original...
p/s: virus ade di mana2...jaga kesihatan anda...:P
Sunday, April 3, 2011
How to join .001, .002, .003 file format using command prompt.
I know many of my blog readers love to download right?Which website is your download centre?For me, I usually goes to http://www.wisernet.org/ or you can download from the list here:
http://teamaryzs.com/
http://gilemovie.blogspot.com/
http://www.theamh.com/
http://mediafire4u.info/
http://www.print-ur-life.blogspot.com/
http://www.syok.org/
http://www.getmediafire.com/
http://nurcellmovies.blogspot.com/
http://www.mkvmoviez.com
http://300mkvmovies.blogspot.com/
http://www.megafires.com/
http://www.moviesnhacks.com/
http://www.mediafire4u.com/
http://mediafiremoviez.com
http://mediafire-strain.blogspot.com/
http://www.yourpcmovies.net
http://moviesmediafire.blogspot.com/
http://mediafiremovies.com
http://mediafire-movie-collection.blogspot.com/
http://greatestmoviecollection.blogspot.com/
http://www.whynotdownload.com
http://allmedia4u-dizzydude.blogspot.com/
http://buzymovie.blogspot.com/
http://mediafirepower.blogspot.com/
http://www.300mbmovie.com
http://hollymoviebd.blogspot.com/
http://np90.blogspot.com/
http://yahoochowk.blogspot.com/
http://sazwan-mediafire.blogspot.com/
http://directdownloadmoviefree.blogspot.com/
http://mediafiere-moviez-link.blogspot.com/
http://300mbmovie.blog.com/
http://movieshouse88.blogspot.com/
http://www.blurayrips.co.cc
http://jojumohan.blogspot.com/
http://movieegy1.blogspot.com/
http://mediafire-blogspot.blogspot.com/
http://download2u-movies.blogspot.com/
http://www.mediafirefilms.com
http://mediafirelinks4movies.blogspot.com
http://movieforfriends.blogspot.com/
http://www.movieloo.info/
http://movies-place.blogspot.com/
http://rapidlinksbyannu.blogspot.com/
http://aio-download-sharing.blogspot.com/
http://mediafireunlimited.blogspot.com/
http://themoviescollection.blogspot.com/
http://mfire-sharelink.blogspot.com/
http://mediafiremoviez.com
http://mediafiremovies.com
http://www.yourpcmovies.net
http://moviesmediafire.blogspot.com/
http://greatestmoviecollection.blogspot.com/
http://www.flickjunction.com/
http://www.whynotdownload.com
http://www.yourpcmovies.net
http://moviesmediafire.blogspot.com/
http://greatestmoviecollection.blogspot.com/
http://www.whynotdownload.com
http://mediafire-english-movies.blogspot.com/
Most of movie that I download here is using movie.001,movie.002 format. They split the file so that the size can be reduce for each file. They use hjsplit to split the file and after you download the file, you also can use command prompt for windows operating system.
Firstly, you have to open the command prompt. window>run
type "cmd" and enter
Second, go to where you download the file.
for me, I put my download file in download folder.
I type "cd C:\Users\Shino\Downloads" and enter
Third, copy the file name and then, type "copy /b "movieName.avi.001"+"movieName.avi.002" "movieName.avi"" and enter.
Wait until window finish join your file.
Done.
Monday, March 21, 2011
Camne nak layari laman web yang kena block.
Kali ni shino nak share sikit pasal knowledge yang shino baru dapat. Tiap kali korang surf internet, ade tak website yang korang tak leh layari?besenye kalau kat sekolah @ kolej @ universiti, korang punye network admin akan filter korang punye network @ block website tertentu. Btul tak?
Untuk pengetahuan korang, network admin kebiasaannye akan block gune DNS(Domain Name Service). Dalam router, diorang akan filter website n IP address yang tak sepatutnye korang layari. So, korang tak akan boleh ke website tu sebab korang gune DNS tersebut. Camne kalau korang ade website yang korang nak layari, tapi korang nak layari jugak.
Kebanyakan orang akan gune proxy kalau nak layari jugak. Shino tak nak cerita pasal proxy kat sini. Maybe len kali la kot.
Camne nak tukar DNS Ip kat pc/laptop korang?caranye camni:
1 - Bukak control panel korang, pastu tekan network and sharing center.
2 - Dekat connection, ade connection pe yang korang connect kan?tekan benda tu.(Shino punye wireless network connection)
3 - Pastu korang tekan properties.
4 - Die kuar network connection properties kan?Tekan internet protocol version 4, pastu tekan properties.
5 - Die akan kuar cam gambar kat bawah ni kan?
6 - Korang tekan kat use the following DNS server address.
7 - korang masukkan preferred DNS server 8.8.8.8
8 - korang masukkan alternate DNS server 8.8.4.4
9 - Pastu tekan ok, pastu close semua.
korang try layari laman web yang kena block tu. leh tak?Semoga berjaya.
P/S: Shino wat kat shino punye network, ok je. takde masalah. untuk pengetahuan korang la, DNS server yang shino bagi ni, google punye free DNS server. setakat ni, google takde block pape lagi la.
Wednesday, September 22, 2010
My adsense account has been disabled?
What the....
Terkejut shino pagi tadi bile bukak gmail, ade e-mail dari adsense cakap account adsense shino da disable....Aduyai...
E-mail die cmmni...
This message was sent from a notification-only email address that does not
accept incoming email. Please do not reply to this message.
---------------------------------------------------------------
Hello,
After reviewing our records, we've determined that your AdSense account
poses a risk of generating invalid activity. Because we have a
responsibility to protect our AdWords advertisers from inflated costs due
to invalid activity, we've found it necessary to disable your AdSense
account. Your outstanding balance and Google's share of the revenue will
both be fully refunded back to the affected advertisers.
Tuesday, September 21, 2010
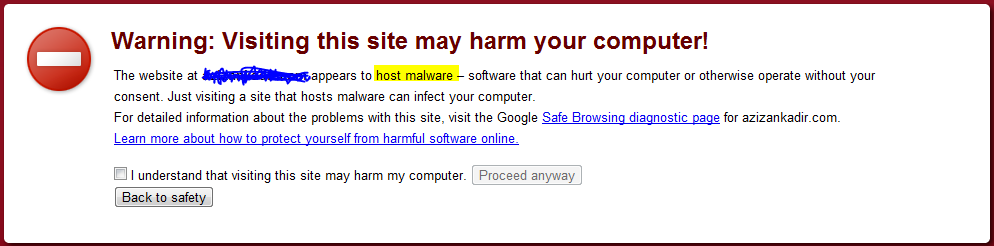
Malware mnyerang blogger
Kepada para blogger skalian.
Hati2 dgn malware ni.
Klu gune google chrome browser, warning ini akan muncul. Klu warning camni, die ckp blog ni host malware, ade script a.k.a coding dlm blog ni perlu di buang. Contohnye gadget y korang add 2, ade add html code @ js code, link y korg amik ni dari website y mnyebarkn malware.
Monday, August 23, 2010
Con Job: Hong Leong/Bumiputra Commerce/AmbankGroup/Alliance Bank
Hello to all, |
Saturday, January 10, 2009
REMOVE FONTS FOR SPEED
Fonts, especially TrueType fonts, use quite a bit of system resources. For optimal performance, trim your fonts down to just those that you need to use on a daily basis and fonts that applications may require.
1. Open Control Panel
2. Open Fonts folder
3. Move fonts you don’t need to a temporary directory (e.g. C:\FONTBKUP?) just in case you need or want to bring a few of them back. The more fonts you uninstall, the more system resources you will gain.
1. Open Control Panel
2. Open Fonts folder
3. Move fonts you don’t need to a temporary directory (e.g. C:\FONTBKUP?) just in case you need or want to bring a few of them back. The more fonts you uninstall, the more system resources you will gain.
REMOVE THE DESKTOP PICTURE
Your desktop background consumes a fair amount of memory and can slow the loading time of your system. Removing it will improve performance.
1. Right click on Desktop and select Properties
2. Select the Desktop tab
3. In the Background window select None
4. Click Ok
1. Right click on Desktop and select Properties
2. Select the Desktop tab
3. In the Background window select None
4. Click Ok
IMPROVE BOOT TIMES
BootVis will significantly improve boot times
1. Download and Run
2. Select Trace
3. Select Next Boot and Driver Trace
4. A Trace Repetitions screen will appear, select Ok and Reboot
5. Upon reboot, BootVis will automatically start, analyze and log your system’s boot process. When it’s done, in the menu go to Trace and select Optimize System
6. Reboot.
7. When your machine has rebooted wait until you see the Optimizing System box appear. Be patient and wait for the process to complete
1. Download and Run
2. Select Trace
3. Select Next Boot and Driver Trace
4. A Trace Repetitions screen will appear, select Ok and Reboot
5. Upon reboot, BootVis will automatically start, analyze and log your system’s boot process. When it’s done, in the menu go to Trace and select Optimize System
6. Reboot.
7. When your machine has rebooted wait until you see the Optimizing System box appear. Be patient and wait for the process to complete
OPTIMISE YOUR PAGEFILE
If you give your pagefile a fixed size it saves the operating system from needing to resize the page file.
1. Right click on My Computer and select Properties
2. Select the Advanced tab
3. Under Performance choose the Settings button
4. Select the Advanced tab again and under Virtual Memory select Change
5. Highlight the drive containing your page file and make the initial Size of the file the same as the Maximum Size of the file.
Windows XP sizes the page file to about 1.5X the amount of actual physical memory by default. While this is good for systems with smaller amounts of memory (under 512MB) it is unlikely that a typical XP desktop system will ever need 1.5 X 512MB or more of virtual memory. If you have less than 512MB of memory, leave the page file at its default size. If you have 512MB or more, change the ratio to 1:1 page file size to physical memory size.
1. Right click on My Computer and select Properties
2. Select the Advanced tab
3. Under Performance choose the Settings button
4. Select the Advanced tab again and under Virtual Memory select Change
5. Highlight the drive containing your page file and make the initial Size of the file the same as the Maximum Size of the file.
Windows XP sizes the page file to about 1.5X the amount of actual physical memory by default. While this is good for systems with smaller amounts of memory (under 512MB) it is unlikely that a typical XP desktop system will ever need 1.5 X 512MB or more of virtual memory. If you have less than 512MB of memory, leave the page file at its default size. If you have 512MB or more, change the ratio to 1:1 page file size to physical memory size.
OPTIMISE YOUR INTERNET CONNECTION
There are lots of ways to do this but by far the easiest is to run TCP/IP Optimizer.
1. Download(http://www.speedguide.net/files/tcpoptimizer.exe) and install
2. Click the General Settings tab and select your Connection Speed (Kbps)
3. Click Network Adapter and choose the interface you use to connect to the Internet
4. Check Optimal Settings then Apply
5. Reboot
1. Download(http://www.speedguide.net/files/tcpoptimizer.exe) and install
2. Click the General Settings tab and select your Connection Speed (Kbps)
3. Click Network Adapter and choose the interface you use to connect to the Internet
4. Check Optimal Settings then Apply
5. Reboot
IMPROVE MEMORY USAGE
Cacheman Improves the performance of your computer by optimizing the disk cache, memory and a number of other settings.
Once Installed:
1.Go to Show Wizard and select All
2.Run all the wizards by selecting Next or Finished until you are back to the main menu. Use the defaults unless you know exactly what you are doing.
3.Exit and Save Cacheman
4.Restart Windows
Once Installed:
1.Go to Show Wizard and select All
2.Run all the wizards by selecting Next or Finished until you are back to the main menu. Use the defaults unless you know exactly what you are doing.
3.Exit and Save Cacheman
4.Restart Windows
SPEEDUP FOLDER BROWSING
You may have noticed that everytime you open my computer to browse folders that there is a slight delay. This is because Windows XP automatically searches for network files and printers everytime you open Windows Explorer. To fix this and to increase browsing significantly:
1. Open My Computer
2. Click on Tools menu
3. Click on Folder Options
4. Click on the View tab.
5. Uncheck the Automatically search for network folders and printers check box
6. Click Apply
7. Click Ok
8. Reboot your computer
1. Open My Computer
2. Click on Tools menu
3. Click on Folder Options
4. Click on the View tab.
5. Uncheck the Automatically search for network folders and printers check box
6. Click Apply
7. Click Ok
8. Reboot your computer
DISABLE PERFORMANCE COUNTERS
Windows XP has a performance monitor utility which monitors several areas of your PC’s performance. These utilities take up system resources so disabling is a good idea.
To disable:
1. download and install the Extensible Performance Counter List(http://www.microsoft.com/windows2000/remove404.mspx)
2.Then select each counter in turn in the ‘Extensible performance counters’ window and clear the ‘performance counters enabled’ checkbox at the bottom.button below.
To disable:
1. download and install the Extensible Performance Counter List(http://www.microsoft.com/windows2000/remove404.mspx)
2.Then select each counter in turn in the ‘Extensible performance counters’ window and clear the ‘performance counters enabled’ checkbox at the bottom.button below.
OPTIMISE DISPLAY SETTINGS
Windows XP can look sexy but displaying all the visual items can waste system resources. To optimise:
1.Go to Start
2. Click Settings
3. Click Control Panel
4. Click System
5. Click Advanced tab
6. In the Performance tab click Settings
7. Leave only the following ticked:
- Show shadows under menus
- Show shadows under mouse pointer
- Show translucent selection rectangle
- Use drop shadows for icons labels on the desktop
- Use visual styles on windows and buttons
1.Go to Start
2. Click Settings
3. Click Control Panel
4. Click System
5. Click Advanced tab
6. In the Performance tab click Settings
7. Leave only the following ticked:
- Show shadows under menus
- Show shadows under mouse pointer
- Show translucent selection rectangle
- Use drop shadows for icons labels on the desktop
- Use visual styles on windows and buttons
DISABLE INDEXING SERVICES
Indexing Services is a small little program that uses large amounts of RAM and can often make a computer endlessly loud and noisy. This system process indexes and updates lists of all the files that are on your computer. It does this so that when you do a search for something on your computer, it will search faster by scanning the index lists. If you don’t search your computer often, or even if you do search often, this system service is completely unnecessary. To disable do the following:
1. Go to Start
2. Click Settings
3. Click Control Panel
4. Double-click Add/Remove Programs
5. Click the Add/Remove Window Components
6. Uncheck the Indexing services
7. Click Next
1. Go to Start
2. Click Settings
3. Click Control Panel
4. Double-click Add/Remove Programs
5. Click the Add/Remove Window Components
6. Uncheck the Indexing services
7. Click Next
Svchost.exe caused CPU usage 100%, this is the solution.
Press Alt-Ctrl Delete, and click on Processes. You will notice that Svchost.exe have occupied most of the memory capacity. Here is some solution in order to fix it. It works... icon_rolleyes.gif
1. Click Start->Run, type "services.msc" (without quotation marks) in the
open box and click OK.
2. Double click the service "Automatic Updates".
3. Click on the Log On tab, please ensure the option "Local System account"
is selected and the option "Allow service to interact with desktop" is
unchecked.
4. Check if this service has been enabled on the listed Hardware Profile. If
not, please click the Enable button to enable it.
5. Click on the tab "General "; make sure the "Startup Type" is "Automatic".
Then please click the button "Start" under "Service Status" to start the
service.
6. Repeat the above steps with the other service: Background Intelligent
Transfer Service (BITS)
Step 4: Re-register Windows Update components and Clear the corrupted
Windows Update temp folder
1. Click on Start and then click Run,
2. In the open field type "REGSVR32 WUAPI.DLL" (without quotation marks) and
press Enter.
3. When you receive the "DllRegisterServer in WUAPI.DLL succeeded" message,
click OK.
4. Please repeat these steps for each of the following commands:
REGSVR32 WUAUENG.DLL
REGSVR32 WUAUENG1.DLL
REGSVR32 ATL.DLL
REGSVR32 WUCLTUI.DLL
REGSVR32 WUPS.DLL
REGSVR32 WUPS2.DLL
REGSVR32 WUWEB.DLL
After the above steps are finished. Sicne temporary folder of Windows Update
may be corrupted. We can refer to the following steps to rename this folder
that
1. Click Start, Run, type: cmd and press Enter. Please run the following
command in the opened window.
net stop WuAuServ
(note, you might need to reboot before the net stop command will work)
2. Click Start, Run, type: %windir% and press Enter.
3. In the opened folder, rename the folder SoftwareDistribution to SDold.
1. Click Start->Run, type "services.msc" (without quotation marks) in the
open box and click OK.
2. Double click the service "Automatic Updates".
3. Click on the Log On tab, please ensure the option "Local System account"
is selected and the option "Allow service to interact with desktop" is
unchecked.
4. Check if this service has been enabled on the listed Hardware Profile. If
not, please click the Enable button to enable it.
5. Click on the tab "General "; make sure the "Startup Type" is "Automatic".
Then please click the button "Start" under "Service Status" to start the
service.
6. Repeat the above steps with the other service: Background Intelligent
Transfer Service (BITS)
Step 4: Re-register Windows Update components and Clear the corrupted
Windows Update temp folder
1. Click on Start and then click Run,
2. In the open field type "REGSVR32 WUAPI.DLL" (without quotation marks) and
press Enter.
3. When you receive the "DllRegisterServer in WUAPI.DLL succeeded" message,
click OK.
4. Please repeat these steps for each of the following commands:
REGSVR32 WUAUENG.DLL
REGSVR32 WUAUENG1.DLL
REGSVR32 ATL.DLL
REGSVR32 WUCLTUI.DLL
REGSVR32 WUPS.DLL
REGSVR32 WUPS2.DLL
REGSVR32 WUWEB.DLL
After the above steps are finished. Sicne temporary folder of Windows Update
may be corrupted. We can refer to the following steps to rename this folder
that
1. Click Start, Run, type: cmd and press Enter. Please run the following
command in the opened window.
net stop WuAuServ
(note, you might need to reboot before the net stop command will work)
2. Click Start, Run, type: %windir% and press Enter.
3. In the opened folder, rename the folder SoftwareDistribution to SDold.
If you are having task manager problem, What to do with task manager problem
Task manager can stop working for a number of reasons, I'll go over some fixes from easiest to hardest
See if taskmgr exists
1) Click Start -> Search
2) Click All files and folders
3) Search for taskmgr and set location to %systemroot% (usually C:\Windows or C:\winnt). You can actually type "%systemroot%" as well.
4) You should find in the list:
%systemroot%\system32\taskmgr.exe 133KB
If you cannot find this file, you can extract it off your XP CD again. Refer to APPENDIX on how to extract the file. The help files CHM and HLP are not needed to run taskmgr.
Once the files are in place, try running taskmgr again. Try double-clicking on the program icon itself in the system32 folder.
If you can run Task Manager by double-clicking it, but NOT by ctrl-alt-del or ctrl-shift-esc OR start -> Run Taskmgr, then check the PATH variable:
1) Right Click My Computer and choose Properties
2) Click the Advanced tab
3) Click the Environment Variables button
4) In the System variables section, find the "Path" entry.
5) Make sure that the following are in this list. Each path is sepparated by a semicolon.
These are EXACT terms, %systemroot% means %systemroot%
%SystemRoot%\system32
%SystemRoot%
Check environment variable systemroot
If the previous PATH entries ARE there, make sure that the %systemroot% variable ITSELF is in tact. Here's how:
1) Click Start -> Run and type %systemroot% and hit Enter.
This should open your Windows folder. Which is almost always C:\Windows, or C:\winnt.
If it doesn't open your Windows folder, but goes somewhere else, or throws an error, refer to Appendix "Fix systemroot". If it DOES open the correct folder, then you're fine on this point.
Once you KNOW that all the right files are there, and the variables are in tact. Move on to...
Check user and system policies
Note that if you have a policy problem, you will usually get an error when you try to open it, such as "The system administrator has disabled Task Manager" or something similar.
1) Make sure you are logged in as a user with administrative privileges. You can see which users are admins by going in Control Panel and clicking the Users icon.
2) Start -> Run regedit
3) Browse to:
HKEY_CURRENT_USER\Software\Microsoft\Windows\CurrentVersion\Policies
4) Click on each subfolder under Policies (it is usually System that has the entry).
5) You will see in the right-hand side, and entry called DisableTaskMgr.
If you see this key (right side), just highlight it and delete the key. Note that if the key's value was "1", that is why you can't open Task Manager.
6) Also check this key:
HKEY_LOCAL_MACHINE\Software\Microsoft\Windows\CurrentVersion\Policies
Repeat from above and delete the key DisableTaskMgr.
If for some reason that doesn't work, I found one case where just typing this into the Run box does the trick, here is the command:
REG add HKCU\Software\Microsoft\Windows\CurrentVersion\Policies\System /v DisableTaskMgr /t REG_DWORD /d 0 /f
It basically does the same thing of changing it manually in the registry. But just in case...
You'll have to log off and on for these changes to take effect.
If Task Manager still doesn't work, check the same registry keys you changed above, if they are back to the way they were before, then you have malware setting it this way. And so...
Clean system of malway and viruses
See if taskmgr exists
1) Click Start -> Search
2) Click All files and folders
3) Search for taskmgr and set location to %systemroot% (usually C:\Windows or C:\winnt). You can actually type "%systemroot%" as well.
4) You should find in the list:
%systemroot%\system32\taskmgr.exe 133KB
If you cannot find this file, you can extract it off your XP CD again. Refer to APPENDIX on how to extract the file. The help files CHM and HLP are not needed to run taskmgr.
Once the files are in place, try running taskmgr again. Try double-clicking on the program icon itself in the system32 folder.
If you can run Task Manager by double-clicking it, but NOT by ctrl-alt-del or ctrl-shift-esc OR start -> Run Taskmgr, then check the PATH variable:
1) Right Click My Computer and choose Properties
2) Click the Advanced tab
3) Click the Environment Variables button
4) In the System variables section, find the "Path" entry.
5) Make sure that the following are in this list. Each path is sepparated by a semicolon.
These are EXACT terms, %systemroot% means %systemroot%
%SystemRoot%\system32
%SystemRoot%
Check environment variable systemroot
If the previous PATH entries ARE there, make sure that the %systemroot% variable ITSELF is in tact. Here's how:
1) Click Start -> Run and type %systemroot% and hit Enter.
This should open your Windows folder. Which is almost always C:\Windows, or C:\winnt.
If it doesn't open your Windows folder, but goes somewhere else, or throws an error, refer to Appendix "Fix systemroot". If it DOES open the correct folder, then you're fine on this point.
Once you KNOW that all the right files are there, and the variables are in tact. Move on to...
Check user and system policies
Note that if you have a policy problem, you will usually get an error when you try to open it, such as "The system administrator has disabled Task Manager" or something similar.
1) Make sure you are logged in as a user with administrative privileges. You can see which users are admins by going in Control Panel and clicking the Users icon.
2) Start -> Run regedit
3) Browse to:
HKEY_CURRENT_USER\Software\Microsoft\Windows\CurrentVersion\Policies
4) Click on each subfolder under Policies (it is usually System that has the entry).
5) You will see in the right-hand side, and entry called DisableTaskMgr.
If you see this key (right side), just highlight it and delete the key. Note that if the key's value was "1", that is why you can't open Task Manager.
6) Also check this key:
HKEY_LOCAL_MACHINE\Software\Microsoft\Windows\CurrentVersion\Policies
Repeat from above and delete the key DisableTaskMgr.
If for some reason that doesn't work, I found one case where just typing this into the Run box does the trick, here is the command:
REG add HKCU\Software\Microsoft\Windows\CurrentVersion\Policies\System /v DisableTaskMgr /t REG_DWORD /d 0 /f
It basically does the same thing of changing it manually in the registry. But just in case...
You'll have to log off and on for these changes to take effect.
If Task Manager still doesn't work, check the same registry keys you changed above, if they are back to the way they were before, then you have malware setting it this way. And so...
Clean system of malway and viruses
Subscribe to:
Posts (Atom)